I am giving the measurements that I tried but you can change them for a box in different dimensions and sorry to explain it in metric standards but you know, it's not important at all! Just follow the instructions. (In case you need: 1 cm: 0.39 inch 1inch: 2.54 cm)
Here are the materials: Cardboard (thicker comes out better), scissors, glue, ruler, pencil, a piece of paper, embellishments
Here are the materials: Cardboard (thicker comes out better), scissors, glue, ruler, pencil, a piece of paper, embellishments
 1. You will cut two different sizes of square cardboards for the box and its cover.
 2. The perfect the squares are, the perfect the result is.  5. Cut another square cardboard for the cover measuring 19*19 cm (it is smaller than the one for the box because that way the cover will come out shorter than the box and will be easy to take of while opening- experience speaking! :)
3. Cut a square cardboard measuring 20.5*20.5 cm (This is for the box)
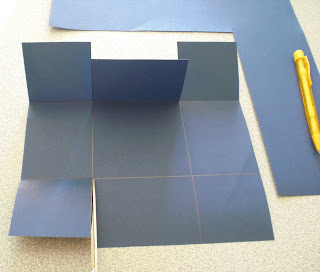
4. Draw a square right on the middle of the cardboard measuring 8.5*8.5 cm as in the picture below. (means 6 cm inside from all the edges.) I hope the black lines are visible enough!
5. Cut another square cardboard for the cover measuring 19*19 cm (it is smaller than the one for the box because that way the cover will come out shorter than the box and will be easy to take of while opening- experience speaking! :)6. Draw a square right on the middle of the cardboard measuring 9*9 cm (means 5 cm inside from all edges)
7. It is the same both for the box and cover after here.
8. Cut until the edge of the square inside- where the end of the scissors is as seen in the picture below)
 10. Cut on the line near it as seen in the picture below.
 11. Fold on the lines as below.
12. Cut and fold across them just the same. You can see below.


13. Now fold the right and left following the edges of the square inside as seen below.

14. Here is what it looks like when you all gather them.

15. Glue the ears (this is how I call them) inside. Put a piece of white paper under them while gluing so that you can glue the edges better without dirt around it. See below.


Just before I wrote this post I saw a thread in Etsy Forum asking whether anyone does DIY gift boxes and I think I need opinions on this one. I got a cardboard in this color because my Etsy shop is called "Derin Mavi" which means deep blue in English. So I wanted it to be matching. And I thought evil eye beads were suitable for embelishments because they are also blue and something from Turkish culture. Do you think it came out nice to send package to a customer? Or would you be turned off when you saw it? Should I add or change something?


16. Paste them as in the previous picture where all of the "ears" are gathered.
17. Embellish :)
Just before I wrote this post I saw a thread in Etsy Forum asking whether anyone does DIY gift boxes and I think I need opinions on this one. I got a cardboard in this color because my Etsy shop is called "Derin Mavi" which means deep blue in English. So I wanted it to be matching. And I thought evil eye beads were suitable for embelishments because they are also blue and something from Turkish culture. Do you think it came out nice to send package to a customer? Or would you be turned off when you saw it? Should I add or change something?